How to recover deleted files from Macbook?
Deleting precious files on your Mac Laptop by accident can be a gut-wrenching experience. Whether it's important data or something of sentimental value, losing files is frustrating. Also, you may not know how to recover your deleted files. You're trying everything but nothing seems to be working. If this is an experience you're going through, then don't worry. Luckily, there are ways to recover deleted files from your Macbook.
Data Recovery Software to Recover Your Data
Stellar's data recovery software enables you to recover files you deleted by accident. You could have emptied your recycle bin or deleted files from your Mac's trash. Fret not. Stellar's data recovery software can help you retrieve all your deleted files. Stellar Data Recovery Professional for MAC is software that recovers permanently deleted files. It also recovers deleted files from an external hard drive.
Steps to Recover Deleted Files from Macbook?
Here's a guide on how to recover deleted files from your Macbook
Step 1
Download & install the Software.
Step 2
Run the software. You will get a screen asking you what you want to recover, whether it's documented, photos, videos, and so on. It could also be a combination of more than one type of file if you've deleted many files by accident.
Step 3
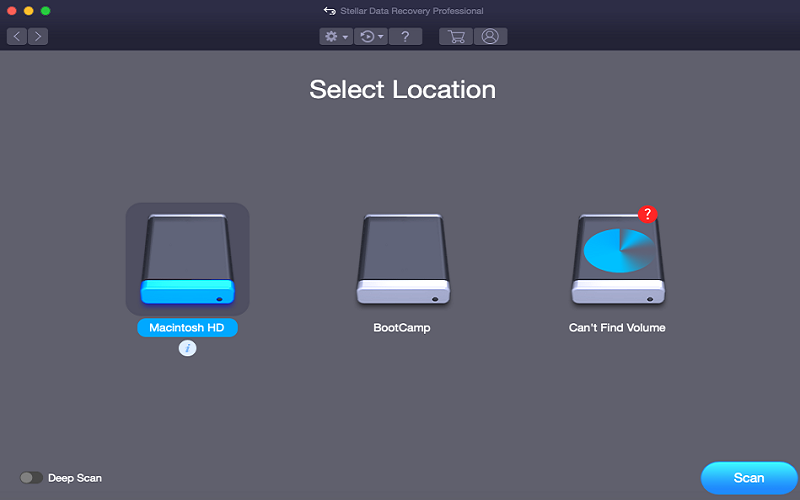
You need to select the drive from which the data recovery process will take place. It will be the drive in which Trash is there because the data is to be recovered from here. Toggle the deep scan button located on the bottom left-hand side. Then, click on the scan button on the bottom right.
Here's the image that will help you get an exact idea of what you need to do.

Step 4
Be patient and allow the scanning process to complete. This may take a little time as the software is going through the entire hard disk.
There are two types of recovery that you can choose from.
1) Quick Recovery.
2) Raw Recovery (signature-based scanning).
Quick recovery is much faster than the Raw recovery. But, Raw recovery takes a lot longer than Quick recovery. This is because it scans all the hard drive blocks and sectors for the lost data. In either case, the process shouldn't take more than a few hours. Remember not to pause the process once you start. If you do, it will begin from the starting point again and not from where you left off.

Step 5
Once the scanning is complete, the software will show all the recoverable files. The files are in a Tabbed view of scanned Tree – Classic List / File List / Deleted List.

Step 6
Choose the file or folder which you want to recover and launch Preview Select for this folder.

Step 7
Click on the Recover button. Choose a different destination (other than the Mac HD) to save the recoverable files.
You must also remember that the sooner you recover your deleted files the better it is. Hard drives go through read-write processes. This results in overwriting of the data present at that location. Once the data is overwritten it is difficult for any data recovery tool to trace it. That's why it's better not to wait too long and recover your data as soon as you can.

Step 8
Register and activate the license version of Stellar Data Recovery Professional for Mac. This will allow you to save the recovered files to a different destination.
Conclusion
Often, when we face a situation like losing precious files, we're unable to think with a clear head. As a result, we may lose precious time and end up causing further damage. In such a situation, it’s best to rely on a reputed data recovery software like Stellar. Here are some factors which make Stellar stand out from the rest in the market.
- Stellar has been in the data recovery business for the past 25 years.
- Stellar’s software helps you recover as many as 300+ file types.
It’s best not to fret too much and use Stellar’s Data Recovery software to recover important files.


